
In Part I, we planted the seeds of how to start your medicinal herb garden, and with any luck, you’ll start seeing new life sprouting soon. It’s such an exciting time when fresh greenery begins to poke its head out from the soil, and it’s hard not to feel a little buzz every time it happens!
After the initial euphoria, it’s not uncommon for green-thumbed newcomers to feel a bit of panic. What now? How do I ensure these little guys grow up strong and healthy? And when’s the right time to actually use them?
When you think about it, growing medicinal herbs is about so much more than saving a few bucks or having a pretty garden. It’s about tapping into age-old wisdom that our ancestors swore by. They trusted those little leaves, roots, stems, seeds, and flowers to aid in their health and healing, so it’s our job as modern medicinal herbalists to honor that legacy through proper tending and care.
So, that’s what we’ll discuss today! We’ll cover all the information you need to help your herb garden thrive before sharing expert advice on harvesting and harnessing all of nature’s goodness.
If you’re here for the answers to the newsletter quiz, scroll all the way to the bottom 🙂
Garden Maintenance
A healthy, happy herb garden yields herbs with higher therapeutic potency, but New Orleans’ climate does mean there are some special considerations. We’ll show you how to create the perfect conditions to help your herb garden thrive in the humid Delta heat.
Soil Health
Every flourishing herb garden space starts with healthy soil. As we discussed in part one, the ground you plant in is a living, breathing biome teeming with beneficial microorganisms that offer innumerable benefits to medicinal plants.
Much like a vegetable garden, you must consider what you allow into your soil because those herbs will go into or on your body. Anything that has the potential to pollute or poison should be avoided. So, let’s focus on natural ways to maintain soil health when growing medicinal herb gardens.
Compost Regularly
Composting is nature’s way of recycling by breaking down organic matter like veggie scraps and fallen leaves into a dark, nutrient-rich substance called humus packed with beneficial microorganisms. These tiny creatures help break down organic matter, releasing nutrients in a form that plants can easily absorb.
Another benefit is that humus acts as a sponge, retaining water and nutrients so that the plant roots always have easy access to what they need to grow.
Compost is vital for medicinal herbs because they require more nutrient-rich soil than culinary herbs and other plants to produce the most potent medicinal properties by the end of the growing season.
Do It Yourself! – Creating Your Own Compost
It doesn’t take much to start a compost pile in your backyard, and it’s an earth-loving way to recycle organic waste while benefiting your medicinal herb garden. Here’s a simple guide to get you started:
Materials Needed:
- A closed compost bin or a designated compost area far away from your home to keep rodents away
- Green waste like vegetable scraps, fruit peels, tea bags, coffee grounds, egg shells, and fresh grass clippings
- Brown waste like dried leaves, straw, cardboard, and newspaper
- Garden soil or existing compost (optional, to speed up the process)
- Water
Steps:
- Start with an aerating layer of coarse, dry material like twigs at the bottom. Then, add a layer of green waste followed by brown waste. Aim for a 3:1 ratio of brown waste to green waste to help speed up decomposition and prevent the pile from getting too soggy or smelly.
- Turn your compost using a shovel or garden fork every week to introduce some air into the pile. Enough air in the mix speeds up decomposition and prevents the accumulation from becoming anaerobic (lacking oxygen).
- After turning, check that your compost pile is as moist as a wrung-out sponge. If it’s too dry, sprinkle some water or brown waste if it’s too soggy.
- Over the next few months, the bottom of your pile will turn into dark, crumbly compost. Sprinkle it around the plant roots and watch your medicinal herbs flourish!

Monitor pH Levels
You’ll need to monitor your soil’s pH, or how acidic or alkaline it is, on a scale from 0 (most acidic) to 14 (most alkaline).
Depending on the soil pH, it changes how easily the roots can absorb specific minerals and nutrients.
In acidic soil (pH < 7), iron, manganese, copper, and zinc become more soluble and available to plants. However, these elements can reach toxic levels in the plant if the soil’s acidity is too high. It also limits the availability of phosphorus, calcium, and magnesium, leading to nutrient deficiencies.
The nutrients are well-balanced with neutral soil (pH = 7), so most plants thrive under these conditions.
Finally, alkaline soil (pH > 7) sees elements like calcium and magnesium become more available, but too much of a good thing can sometimes interfere with the uptake of other nutrients. Meanwhile, iron, manganese, boron, copper, and zinc become less available.
Loosening the Soil
Plant roots absorb more than just water and nutrients. They also need oxygen.
The impact of rainfall and foot traffic tamps down the earth, squeezing out air pockets that deliver a steady stream of life-giving air. Then, the roots can’t get enough oxygen to do their job of absorbing nutrients. Take the time to loosen the soil periodically– called “aerating”– to create room within the soil particles for air to reach the roots and improve its ability to drain excess water.
Watering Practices
The Big Easy is notoriously humid and rainy, getting up to 62″ per year, so you have to get the timing and method of your watering practices just right.
Given the high humidity, the soil dries slowly because it doesn’t lose water to dry air. Then, intense rainfalls, especially during summer storms, cause the earth to compact and become waterlogged, which is terrible news for the long-term health of plant roots.
Instead of shallow, frequent watering, it’s better to water deeply and less often because it encourages the roots of your herbs to grow deeper, making them more resilient during drier periods.
Drip systems and soaker hoses are helpful, especially in the summer, as they reduce water loss through evaporation. And, because they deliver water straight to the plant’s base, there’s also less chance of your medicinal herbs developing fungal infections due to sopping wet foliage.
Another tip is to be diligent about mulching. Not only does it help the soil retain moisture, so you’re not constantly giving your plants a drink, but it also prevents water from splashing up from the ground and spreading soil-borne diseases.

Finally, watch the weather. If heavy rain is in the forecast, skip watering for the day. On the flip side, water more often during hot or dry spells.
Remember that overwatering can be just as detrimental as under-watering, so your best bet for a healthy herbalist garden is to monitor the soil’s moisture level. A simple finger test, where you stick your finger an inch into the ground, can help. If it feels dry, it’s time to water; if it is damp, wait a day or two.
Natural Fertilizers
As plants grow, they extract nutrients from the soil by pulling them up through the roots and delivering them to the leaves, stems, flowers, and seeds. Eventually, these nutrient reserves need replenishing in the form of natural fertilizers.
While synthetic fertilizers can give a quick nutrient boost, they might harm the beneficial microorganisms in the soil. On the other hand, natural fertilizers feed the earth and the plant, meaning that your herbal remedies have all the nutrients they need to develop rich compounds and concentrates that provide medicinal benefits.
Table 1: Comparison of Natural Fertilizers
| Fertilizer | What Is It? | Benefits | How to Use | Herb Types & Examples |
| Bone meal | Ground animal bones | High in phosphorus, strengthens roots | Mix into the soil during planting | Herbs with robust root systems. e.g., lavender, calendula |
| Fish emulsion | Liquid derived from fish waste | Rich in nitrogen; promotes leafy growth | Dilute with water; apply monthly | Leafy, fast-growing herbs. e.g., basil, peppermint |
| Compost | Decomposed organic matter | All-around nutrient boost | Mix with soil or top-dress plants | Universal; great for most herbs. |
| Worm castings | Waste produced by earthworms | Improves soil texture, slow-release nutrients | Mix with soil or as a top layer | Herbs requiring rich soil. e.g., lemon balm, valerian |
| Seaweed | Processed marine algae | Micronutrients, stimulates root development | Dilute with water, apply bi-weekly | Herbs sensitive to nutrient fluctuations. e.g., chamomile, St. John’s wort |
| Manure | Animal feces (commonly cow, chicken, horse) | Natural all-purpose fertilizer | Aged only; mix with soil or compost | Herbs needing a consistent nutrient base. e.g., comfrey, stinging nettle |
Mulching
When you mulch your medicinal herbs, you cover the soil with a layer of organic or inorganic materials to help retain soil moisture, suppress weeds, improve soil structure, and steadily release nutrients.
- Pine straw (Pinus spp.) acidifies the soil, which many herbs love. It’s lightweight and lets water through efficiently.
- Cypress mulch decays slowly, making it cost-effective for our rainy New Orleans environment.
- Leaves are a local and sustainable choice. They break down over time, providing added nutrients.
- Straw is great for herb beds because it’s clean and keeps soil temperatures steady.
- Wood chips are perfect for pathways between your herbal patches. They suppress weeds and keep your medicinal garden space tidy.
- Grass clippings are abundant and decompose quickly, providing nitrogen back to the soil.

Pest & Disease Control
Your medicinal herb garden isn’t immune to critters that find those fresh green leaves tasty. The moist, warm climate of New Orleans is home to several pest species, and you can accidentally introduce them when bringing in new plants from your local nursery or wild-sourced cuttings. Always double-check your herbs before putting them in the soil to ensure you’re not welcoming any uninvited guests.
| Pest Name | Scientific Name | Appearance | Common Target Plants | Remedies |
| Aphids | Aphidoidea | Small, soft-bodied insects, often green | Chamomile, mint, echinacea | Neem oil, insecticidal soap, ladybugs |
| Spider Mites | Tetranychidae | Tiny red or brown spiders, fine webbing | Lemon balm, St. John’s Wort | Insecticidal soap, predatory mites |
| Whiteflies | Trialeurodes vaporariorum | Tiny white winged insects | Basil, lavender, sage | Yellow sticky traps, neem oil |
| Slugs and Snails | Gastropoda | Slimy, elongated or rounded creatures | Valerian, calendula, fennel | Diatomaceous earth, copper tape |
| Leaf Miners | Liriomyza spp. | Insects that leave winding trails on leaves | Peppermint, parsley | Neem oil, remove affected leaves |
| Cabbage Loopers | Trichoplusia ni | Green caterpillars | Holy basil (tulsi) | Bacillus thuringiensis (Bt) spray |
| Japanese Beetles | Popillia japonica | Metallic blue-green beetles | Ginseng, dandelion | Neem oil, hand-pick and drown in soapy water |
| Fungus Gnats | Sciaridae | Tiny black flies, often in soil | Comfrey, echinacea | Yellow sticky traps, let soil dry out |
Companion Planting
Throughout the history of medicinal herb gardening, observant green thumbs noticed that certain plants could benefit other plants when planted near each other. You can use this knowledge to thoughtfully plan where you plant your medicinal herb seeds and reap benefits like:
- Pest Control: Some plants exude chemicals from their roots or emit odors that deter pests, protecting neighboring plants.
- Soil Enhancement: Certain plants, like beans and peas, fix nitrogen in the soil, benefiting nitrogen-loving neighbors like corn.
- Optimized Space and Sunlight: Tall plants provide shade for a sun-sensitive or low-growing herb. At the same time, ground-covering plants keep weeds at bay so they’re not sucking up all those great nutrients in your soil.
- Increased Pollination: Some plants attract pollinators, which helps neighboring plants flourish.
Companion Planting Pairs
- Basil (Ocimum basilicum): Plant it alongside rosemary (Rosmarinus officinalis) and sage (Salvia officinalis) to deter pests and create a lovely aromatic corner in your garden.
- Calendula (Calendula officinalis): Calendula invites the good bugs with its sun-like blooms. When placed near lavender (Lavandula angustifolia), it boosts pollinator activity and keeps the fragrant herb pest-free.
- Chamomile (Matricaria chamomilla): This soothing plant has an added perk—it enhances the growth and flavor of nearby plants. Mint (Mentha spp.) thrives exceptionally well next to chamomile.
- Garlic (Allium sativum): Beyond being a kitchen staple, garlic protects many plants. It’s a great buddy for feverfew (Tanacetum parthenium), ensuring the area stays unappetizing for pests.
- Nasturtium (Tropaeolum majus): Its bright blooms and peppery leaves are perfect partners for echinacea (Echinacea purpurea). The duo ensures the soil remains enriched and the area stays less inviting to nuisances.
- Yarrow (Achillea millefolium): This hardy perennial does wonders for the soil’s health. When placed near lemon balm (Melissa officinalis), it attracts beneficial insects and ensures the earth remains rich and well-draining.
- Marigold (Tagetes spp.): These vibrant flowers release a substance that deters nematodes and other pests. They work well with almost any herb but are particularly effective with chamomile and calendula.
- Borage (Borago officinalis): An excellent partner for most plants, it’s known to deter tomato hornworm and cabbage moths. It’s a favorite when planted next to strawberries or any plant from the tomato family.
Medicinal Herb Garden Diseases
New Orleans is a city of rich culture, music, food, and…unfortunately, a few pesky medicinal herb garden diseases. The warm, humid climate makes your herbs a pathogen paradise. As long as you know what to look out for, you can catch it early enough to treat infections or prevent it altogether:
Powdery mildew is one of the most widespread and easily recognizable fungal diseases that can attack various plants, including medicinal herbs.

- Causes: The disease thrives in environments with high humidity and moderate temperatures. It doesn’t necessarily need wet leaves to grow, which makes it distinct from many other fungi.
- Appearance: Initially, small white to grayish powdery spots form, typically on the upper parts of the leaves. As it progresses, these spots enlarge, eventually covering a large portion of the leaf surface, making it look like it’s been dusted with flour.
- Treatment: To manage powdery mildew, ensure plants have proper spacing to enhance air circulation. Always water at the soil level, avoiding foliage. A preventative spray of baking soda, water, and a drop of liquid soap can deter its development. Fungicides are also available for more severe cases.
Downy mildew is another rampant fungal disease, but unlike powdery mildew, this one prefers the underside of leaves.
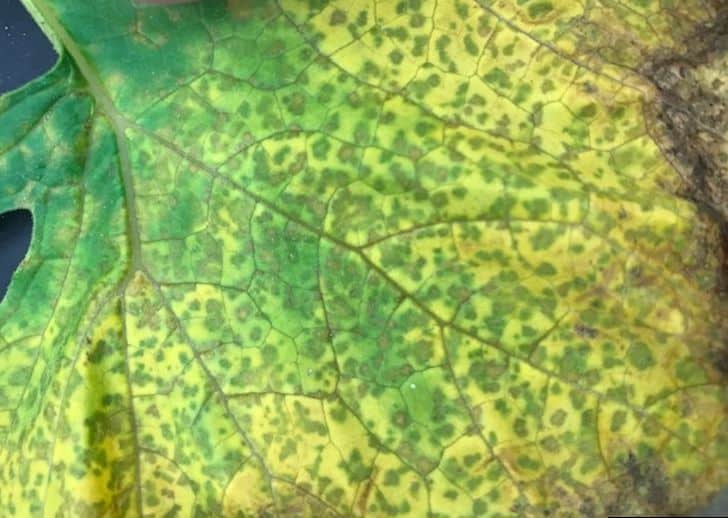
- Causes: It proliferates during extended periods of leaf wetness in cool, humid conditions.
- Appearance: Manifests as yellowish patches on the top of the leaves, while the underside typically showcases purplish-gray, fluffy fungal growths that can resemble fine cotton.
- Treatment: Aim for good air circulation by pruning and spacing plants correctly—always water at the base to keep leaves as dry as possible. Copper-based fungicides can be beneficial.
Septoria Leaf Spot is a sneaky fungal disease that starts inconspicuously but can become problematic if not addressed.

- Causes: The fungus Septoria, which loves lingering in the garden debris and thrives in wet conditions.
- Appearance: It kicks off as small, circular spots with dark borders. These are usually gray in the center and typically form on older leaves first. As the disease matures, these spots might coalesce, causing more significant decay.
- Treatment: Regularly remove affected leaves and consider practicing crop rotation to break the life cycle of the fungus. Applying a copper-based fungicide can stave off further infestation.
Rust comes from a group of fungi that create telltale, rusty-colored blemishes.

- Causes: Different fungi under the Pucciniales order. Spores can be carried by wind or water splash.
- Appearance: Initially, you’ll spot red, orange, or brown pustules on leaf undersides. Over time, the upper leaf surface may turn yellow or brown, and the plant might lose its leaves prematurely.
- Treatment: Affected leaves should be removed and destroyed. Improving air circulation and applying sulfur or copper fungicides can help manage rust.
Root rot is a destructive condition affecting a plant’s root system, making it one of the more challenging diseases to diagnose early on.

- Causes: Fungi like Phytophthora and Rhizoctonia thrive in overly wet or poorly draining soil.
- Appearance: Above ground, the plant may be yellow, wilt, and look stunted. Pulling up an affected plant, you’d see dark, mushy, decaying roots.
- Treatment: Ensure good soil drainage and be mindful not to overwater. Affected plants often need to be removed. Fungicides might help, but prevention through proper planting and care is the best approach.
Anthracnose includes a group of fungal diseases that can severely affect various plants.

- Causes: Fungi in the genus Colletotrichum.
- Appearance: The hallmark of anthracnose is dark, sunken lesions on stems, leaves, and even fruits. As the disease progresses, these spots might ooze a dark fluid during moist conditions.
- Treatment: Regularly prune and destroy affected parts to prevent the spread. Copper-based fungicides can be effective when applied at the onset of the disease.
Harvesting Your Medicinal Herbs
You’ve done your time digging, watering, feeding, and fending off pathogens, so it’s time to reap the rewards by harvesting all those wonderful herbs.
When to Harvest
As with all aspects of medicinal herb gardening, knowing when to harvest is a learning process.
You’ll need to get the timing right and be mindful of where each plant is in its lifecycle to reap the full benefits of your medicine garden. This instinct will come naturally to you the longer you cultivate herbal medicine.
We’ll teach you three ways to determine the proper timing: based on the growing cycle, by using clues in the plant’s appearance, and according to the moon phases.
Method 1: Harvesting According to the Growing Cycle
Annual herbs complete their entire life cycle– from germination to seed production and then death — in a single growing season because they invest most of their energy into rapid growth and reproduction. Their primary goal is to produce as many seeds as possible in one season. The plant will die after seeding, but its progeny will continue in the next season if the seeds find favorable conditions.
- Basil (Ocimum basilicum): Harvest the leaves when they are large and green before the plant starts to flower.
- Chamomile (Matricaria chamomilla): Pick the daisy-like flowers when fully open.
- Cilantro (Coriandrum sativum): Harvest leaves before the plant bolts; for seeds (coriander), wait until they turn brown.
Biennial herbs have a life cycle that spans two years. They typically grow leaves, stems, and roots in the first year. Then, they enter a period of dormancy over the colder months before coming alive again in the second year, during which they flower, produce seeds, and then die. This two-year cycle is a survival adaptation that lets plants focus on establishing a deep, vigorous root system to store energy for flowering and seeding after a dormant period.
- Evening primrose (Oenothera biennis): Harvest in the first fall for the roots. For seeds, wait until the second year when seed capsules are mature but have yet to open fully.
- Mullein (Verbascum thapsus): Harvest the large, fuzzy leaves in the first year and tall yellow flower stalks in the second year.
- Clary sage (Salvia sclarea): Collect the leaves in the first year and the flowering tops in the second year when in full bloom.

Perennial plants can live for several years or even decades. Instead of dying after flowering and seeding, they typically return each year. They often have tubers, bulbs, or rhizomes that allow them to survive harsh conditions by storing nutrients the perennial herb needs to reawaken each new growing season. Some hardy perennials, especially woody plants like trees and shrubs, grow steadily, growing very large over many years.
- Echinacea (Echinacea purpurea): Harvest the roots in the fall of their third growing season. The pink, daisy-like flowers are ready when fully open.
- Mint (Mentha spp.): Harvest the leaves just before flowering to ensure the best flavor and medicinal qualities.
- Comfrey (Symphytum officinale): Harvest the broad leaves before the plant produces bell-shaped flowers.
Method 2: Harvest According to the Appearance
Plants are complex organisms, and their parts mature at different rates throughout the growing season.
When growing herbs for medicinal purposes, know that not all plant components are ready for collection simultaneously. The roots, stems, leaves, flowers, and seeds each have specific periods in which their medicinal properties are most potent.
Furthermore, the same medicinal properties found in one part of the plant might differ in concentration or even kind from another part.
- Seeds: Wait until seeds mature and turn brown or black, but harvest before they disperse.
- Fennel (Foeniculum vulgare): Harvest when seeds turn a light brown.
- Dill (Anethum graveolens): Seeds are ready when flat and have a tan color.
- Caraway (Carum carvi): Harvest when seeds darken to a brown shade.
- Leaves: The best time is typically just before the plant flowers when the leaves are vibrant and full.
- Lemon Balm (Melissa officinalis): Harvest the leaves when bright green and before flowering.
- St. John’s Wort (Hypericum perforatum): Pick the leaves when they’re full size before the yellow flowers bloom.
- Ginkgo (Ginkgo biloba): Harvest the fan-shaped leaves in summer or early fall.
- Flowers: Harvest when they’re fully open but before they start to wilt.
- Lavender (Lavandula angustifolia): Pick the purple flower spikes just as they open.
- Calendula (Calendula officinalis): Harvest the bright orange or yellow flowers when fully open.
- Borage (Borago officinalis): Pick the star-shaped blue flowers throughout summer.
- Stems: Harvest when the plant is mature but before it becomes woody.
- Licorice (Glycyrrhiza glabra): Harvest in the third or fourth year when stems are mature.
- Osha (Ligusticum porteri): Collect the stems in late summer.
- Astragalus (Astragalus membranaceus): Harvest stems in their second year.
- Roots: Typically, the fall of the first or second year is the best time to harvest roots when the plant’s energy is stored below ground.
- Ginseng (Panax ginseng): Harvest in the fall of the fourth or fifth year.
- Burdock (Arctium lappa): Collect the long, brown roots in the fall of the first year.
- Dandelion (Taraxacum officinale): Harvest roots in late fall of the first or second year
Method 3: Harvesting Medicinal Herbs According to the Moon Phases
This age-old practice believes the moon’s gravitational pull influences sap flow within medicinal and culinary herbs.

- New Moon: At the start of the moon’s cycle, its gravitational pull is weakest, making it your prime opportunity to sow seeds in your herb garden.
- Waxing Moon: As the moon fills out night by night, its gravitational force increases, causing sap to rise in plants. During this crescent phase, when the moon grows, it’s your best window to harvest the aerial parts of plants, like leaves and fresh flowers.
- Full Moon to Waning Moon: After the full moon’s peak, the sap begins its journey downwards towards the roots. As the moon starts to wane, this is your cue to harvest the underground parts while they’re brimming with medicinal compounds.
- Last Quarter to New Moon: As the moon continues to wane, it’s a time for the plants and you to rest. Refrain from major harvesting or planting during this period. Instead, nurture and tend to your herb garden, preparing for the next cycle.
How to Harvest Your Medicine Garden
Every time you harvest from your natural medicine cabinet, do so with respect and intention to protect the well-being of your medicinal herbs and retain their potency.
Use Clean, Sharp Tools
Dirty tools can introduce diseases or pests to your plants. Before each harvest, sanitize your shears or scissors with alcohol or a bleach solution. A sharp tool ensures a clean cut, minimizing plant stress and reducing the time it takes for the plant to heal.
Harvest No More Than a Third
Leaving two-thirds of the plant intact allows it to recover quickly and continue its growth. Perennial plants especially benefit from careful stewardship of your herb resources, as it leaves them with enough substance for healthy growth in subsequent seasons.
Prune Carefully
When dealing with branched plants, always cut just above a leaf node (the small bump where a leaf grows) or a branching point. Gentle pruning promotes new plant growth and can encourage the plant to become bushier and more productive.

Respect the Roots
If you’re harvesting roots, do so responsibly. Some medicinal herbs, like comfrey or horseradish, can regenerate from small pieces of root left in the ground. If you do not intend to end the plant’s life cycle, leave a portion of the root system undisturbed.
The Early Bird Gets the Herbs
For most herbs, the optimal time for harvesting is in the morning after the dew has dried but before the sun gets too hot because it’s when your herb garden greenery’s essential oils are at their peak, maximizing their medicinal benefits.
Handling After Harvest
Once you’ve harvested the desired parts, handle them gently. Place them in a basket or tray in a single layer to avoid crushing. If you’re not processing them immediately, store them in a cool, dry place to retain their potency.
Processing and Storing Medicinal Herbs
After careful cultivation and harvesting, the final step is turning your medicinal herb garden into a natural medicine cabinet, always on hand to soothe ailments and calm your mind.
Wellness Teas
Teas are gentle infusions where the medicinal properties of herbs are extracted into water. There are so many different flavors and blends to explore!

Examples:
- Chamomile (Matricaria chamomilla): A simple chamomile tea can ease digestive discomfort and promote relaxation.
- Lemon Balm (Melissa officinalis): A fragrant herb, lemon balm can lift spirits, combat viral infections, and encourage restful sleep.
- Holy Basil (Ocimum sanctum): Revered in many cultures, it’s an adaptogen that helps the body combat stress and balances blood sugar levels.
- Wild Bergamot (Monarda fistulosa): Also known as bee balm, these vibrant blooms fight against viral infections, making them useful during cold and flu season.
- Anise Hyssop (Agastache foeniculum): Its sweet licorice flavor benefits the respiratory system and calms nerves.
- California Poppy (Eschscholzia californica): Gentle yet potent, it can treat symptoms of anxiety and promote sleep.
DIY Tea Recipes
Evening Serenity: Blend chamomile and lemon balm in equal parts. Steep in hot water for 5 minutes. Drink before bedtime for a restful night.
Daytime Vitality: Mix holy basil with a touch of anise hyssop. This blend offers stress relief without causing drowsiness and is ideal for midday consumption.
Herbal Salves

Salves are thickened ointments used topically to nourish the skin or deliver medicinal compounds to address specific issues like inflammation, pain, or wounds. They are typically a blend of infused oils and beeswax, providing a protective layer on the skin, which ensures prolonged contact and absorption of the herbs.
Examples:
- Comfrey (Symphytum officinale): Promotes cell growth, making it valuable for wound healing and bone fractures.
- Lavender (Lavandula angustifolia): Its antiseptic and anti-inflammatory properties aid wound healing and soothe irritations.
- Plantain (Plantago major): Draws out toxins, great for insect bites or splinters.
- Yarrow (Achillea millefolium): Reduces bleeding and has antimicrobial properties.
- Calendula (Calendula officinalis): Offers skin-soothing and anti-inflammatory benefits.
- St. John’s Wort (Hypericum perforatum): A remedy for nerve pain and skin inflammations.
DIY Salve Recipes
Soothing Skin Salve: Melt beeswax in a double boiler, then add calendula and lavender-infused oils. Pour into tins to cool. Use on dry, irritated skin or minor cuts.
Pain-Relief Balm: Combine beeswax with St. John’s Wort and comfrey-infused oils. Once set, apply to areas with nerve pain or muscle discomfort.
Healing Tinctures
Tinctures are concentrated liquid extracts of medicinal herbs preserved in alcohol.

Examples:
- Echinacea (Echinacea purpurea): Boosts the immune system, making it a frontline defense against colds.
- Milk Thistle (Silybum marianum): Supports liver health and detoxification processes.
- Ginkgo Biloba (Ginkgo biloba): Enhances cognitive function and blood circulation for folks with high blood pressure.
- Valerian (Valeriana officinalis): Acts as a sedative, useful for insomnia and anxiety.
- Black Cohosh (Actaea racemosa): Provides relief from menopausal symptoms.
- Dandelion (Taraxacum officinale): Acts as a diuretic and supports liver health.
DIY Tincture Recipes:
Mental Clarity Tincture: Combine equal parts of ginkgo biloba and rosemary tinctures. Take a few drops daily for cognitive support.
Sleep Aid Drops: Mix valerian and lemon balm tinctures. Consume a few drops in water before bedtime for improved sleep quality.
Herbal Medicine Oils
Infused oils carry the medicinal properties of herbs, making them perfect for massages, skincare, or as a base for other herbal preparations. You’ll need a carrier oil, like rose hip or hemp seed.

Examples:
- Rosemary (Rosmarinus officinalis): Stimulates blood flow and eases muscular pain.
- Arnica (Arnica montana): Renowned for reducing bruises and swelling.
- Garlic (Allium sativum): With powerful antimicrobial properties, it’s excellent for ear infections.
- Peppermint (Mentha piperita): Its cooling effect eases headaches and muscle tension.
- Cayenne (Capsicum annuum): Enhances circulation and provides pain relief.
- Chickweed (Stellaria media): Soothes itchy and inflamed skin conditions.
Oil Recipes:
Warmth & Relief Oil: Infuse cayenne and rosemary in olive oil. Strain and use for massages to ease muscle tension and stimulate circulation.
Skin Soothing Oil: Combine chickweed and calendula-infused oils. This blend offers immediate relief for itchy or irritated skin, making it a must-have summer herbal medicine.
10 Tips for Storing Your Herbal Medicine:
- Light can degrade the medicinal compounds in herbs, so use dark glass containers to protect your medicinal herbs and keep them as potent as the day you harvested them.
- Heat and moisture can spoil herbal preparations, so store them in a cool, dry place.
- Seal your medicinal herbs in containers with tight-fitting lids to keep the air off them.
- It’s easy to forget the specifics over time. Label each preparation with the herb’s common and scientific name, creation date, and method. This way, you’ll always know what’s inside and when you made it.
- While herbs are potent, their preparations don’t last forever—1 year for leaves & flowers, two years for roots & barks.
- New Orleans is humid, so consider adding silica gel packets to your dried herb containers to absorb excess moisture.
- As your medicinal herb garden collection grows, create a system that will help you quickly locate all of your herbal resources. Whether you categorize by remedy type or specific ailments they treat, find what works best for you.
- Every few months, check your stash for signs of spoilage, like mold, discoloration, or an off smell. It’s always better to discard anything questionable.
- Use older preparations first to consume remedies at their peak potency and reduce waste.
- Attend workshops, read books, and stay updated with the latest research into medicinal herbs. The more you know, the more effective and safe your herbal practices will be.
Newsletter Quiz Answers


